I’ve been refreshing my first aid every few years for as long as I can remember, but somehow Nicola at High Peak First Aid always manages to deliver something new and practical. This weekend’s 16-hour Wilderness First Aid course was no exception. What stood out most for me this time were two key tools that go beyond the basics: triage and patient monitoring.
Triage
Triage isn’t just for major disasters. It’s a tool we can use in any situation where we need to make quick decisions with limited information. Whether you’re on a remote hike, responding to a group incident or even just first on the scene of a fall, structured triage helps you stay calm and prioritise actions.
We covered the NHS 10-Second Triage Tool, which was new to me. It’s now used across UK emergency services and offers a simple decision tree to help categorise casualties:
- Walking? → Likely P3
- Severe bleeding? → Apply pressure/tourniquet → P1
- Talking? → Check for penetrating injury
- Yes → P1
- No → P2
- Breathing? → Open airway. If breathing, P1. If not, CPR if possible

Nicola also emphasised the importance of using the (M)ETHANE model to report incidents:
- (Major incident declared?)
- Exact location
- Type of incident
- Hazards
- Access routes
- Number of casualties
- Emergency services needed or present
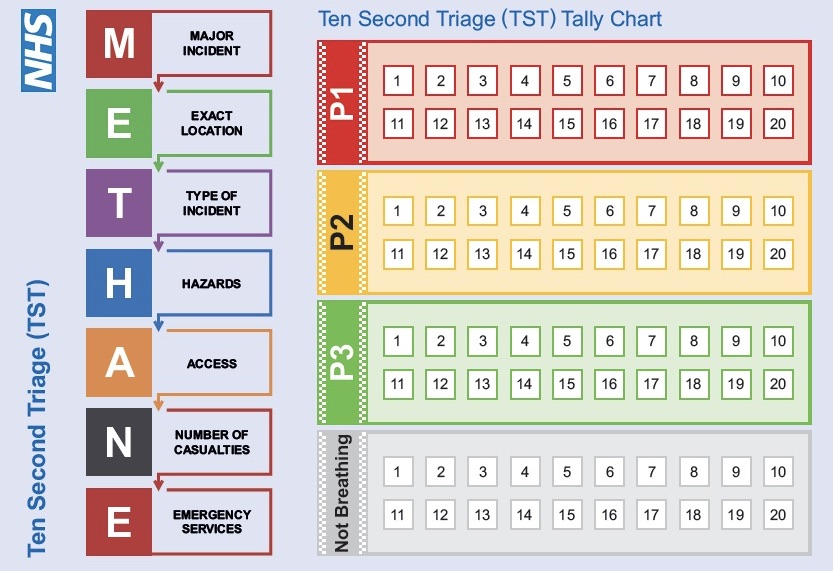
This model creates a shared language and clarity when communicating with emergency services or Mountain Rescue. It also gave me more confidence in what to say if I’m ever making that call.
Monitoring Understanding What Happens Next
The second big insight was about monitoring patients over time, especially when help is delayed. It’s not always about treating and evacuating immediately; sometimes you’re with someone for a long time and you need to understand how their condition is changing.
We looked at NEWS2 (National Early Warning Score 2), a clinical tool that tracks six physiological parameters:
- Respiratory rate
- Oxygen saturation (SpO₂)
- Systolic blood pressure
- Pulse rate
- Level of consciousness. What was AVPU now ACVPU (with confusion added)
- Temperature
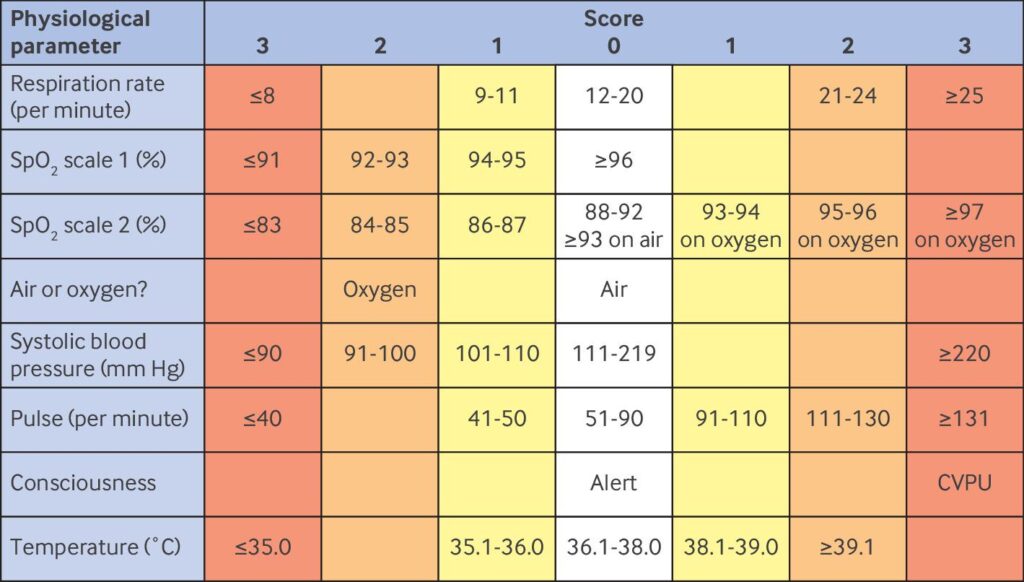
While I won’t be carrying a blood pressure cuff into the mountains, the rest of the signs are easily observed or measured with simple tools:
- Pulse oximeter – SpO₂ and pulse (double checking manual readings)
- In-ear thermometer – quick temperature checks
- Respiratory rate – counted manually
- ACVPU – can be judged with practice
Having a framework like NEWS2 helps you notice subtle deterioration. It gives structure to what you’re observing and makes your handover to rescue teams clearer and more accurate.
What I’m Adding to My Kit
- Pulse oximeter – Lightweight and gives two critical metrics
- In-ear thermometer – Fast, accurate and ideal in cold settings
- Notebook and pencil – To log trends in vital signs
These additions are small in weight but huge in utility when the situation isn’t resolved in the first few minutes.
Reflections
This course reminded me that wilderness first aid is more than a checklist. It’s about developing the mindset and tools to assess, prioritise, monitor, and communicate under pressure. Great to add Triage and NEWS2 to my toolkit for when not just treating someone, but in staying with them, keeping track of how they’re doing and being ready to pass that information on.
If you lead groups or just spend time in remote places, I’d recommend brushing up on your first aid skills and checking out both of these tools.
Reference:
- Triage Tool: NHS 10-Second Triage + METHANE https://www.england.nhs.uk/long-read/ten-second-triage-tool/
- Monitoring Framework: NEWS2 (track 5 of 6 parameters with minimal kit) https://www.rcp.ac.uk/improving-care/resources/national-early-warning-score-news-2/